Facing challenges with your garage door in Winnipeg? This guide simplifies how to install a single torsion spring, a key to smooth operation. Learn the essential steps, from removing the old spring to fine-tuning tension, ensuring your door works perfectly. Ready to enhance your garage door’s functionality with a garage torsion spring Winnipeg? Let’s dive in!
Step-by-Step Process to Install Single Torsion Spring on Garage Door
In Winnipeg, where the weather can be harsh, ensuring your garage door functions properly is crucial. One key component of a garage door’s mechanism is the torsion spring.

This guide will walk you through the process of installing a single torsion spring, a task that, while intricate, can significantly improve the functionality and safety of your garage door.
Step 1: Removing the Old Spring
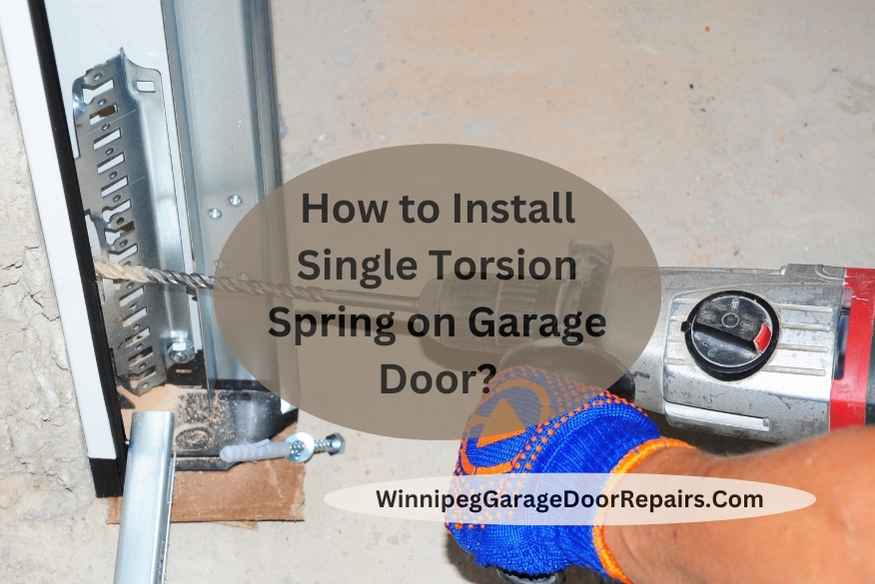
The first step in installing a new torsion spring is to safely remove the old one. This is perhaps the most critical part of the process, as the springs are under a lot of tension and can be dangerous if not handled correctly.
Begin by securing the garage door in place, using clamps or locking pliers on the tracks to prevent it from moving. Then, carefully release the tension in the old spring.
This is typically done by loosening the set screws on the spring and slowly unwinding the spring using winding bars. It’s important to wear eye protection and gloves during this process to protect yourself from potential injury.
Once the tension is released, you can remove the spring from the torsion tube. Be sure to keep track of all hardware and components, as you may need them when installing the new spring.
Step 2: Preparing the New Torsion Spring
Before you can install the new torsion spring, it needs to be prepared. This involves ensuring that the spring is the correct size and type for your garage door.
Incorrectly sized springs can lead to poor functionality and can even be dangerous. Measure the old spring and compare it to the new one to ensure they match. Also, inspect the new spring for any defects or damage before installation.
Once you have the correct spring, lubricate it lightly. This helps in smooth operation and prolongs the life of the spring. Use a garage door-specific lubricant or a light oil to coat the spring.
Read More:- How to Adjust Garage Door Spring?
Step 3: Attaching the Torsion Spring
Attaching the new torsion spring is a precise task. Start by sliding the spring onto the torsion tube, followed by any cable drums, bearings, or other components that were removed with the old spring.
Ensure that the spring is oriented correctly, with the stationary cone (the cone that doesn’t move) towards the center of the garage door and the winding cone (the cone that moves) towards the outside.
Once the spring is in place, reattach the cable drum and any other components, then secure the torsion tube back to the garage door frame. Make sure everything is aligned correctly and that the spring is seated properly.
Step 4: Adjusting Tension in the Spring
Adjusting the tension in the torsion spring is crucial for the proper operation of the garage door. This step requires winding the spring using winding bars.
Insert the bars into the holes on the winding cone and turn them carefully, following the manufacturer’s recommended number of turns. This process increases the tension in the spring, so it’s important to proceed slowly and cautiously.
As you adjust the tension, periodically check the balance of the garage door. You can do this by lifting the door manually to see if it stays open on its own. The goal is to have the door balanced enough to stay open about three to four feet above the ground without assistance.
Read More:- How to Tighten a Garage Door Spring in Winnipeg?
Step 5: Testing the Garage Door Functionality
After the spring is installed and tensioned, it’s time to test the garage door. Remove any clamps or locking pliers and carefully open and close the door several times.
Observe how the door moves. It should open and close smoothly, without any jerking or resistance. Listen for any unusual noises, which could indicate an issue with the installation.
If the door doesn’t open evenly or if it feels too heavy or too light, you may need to adjust the tension in the spring further. It’s not uncommon to need a few minor adjustments to get the tension just right.
Conclusion
Installing a single torsion spring on your garage door in Winnipeg is a detailed process that can greatly improve the functionality and safety of your door. By following these steps carefully and paying attention to detail, you can ensure a successful installation.
Remember, safety is paramount, so take your time and don’t hesitate to seek professional help if you’re unsure about any part of the process. With the right approach, your garage door will be operating smoothly and efficiently in no time.